
Acrylic Nail Ideas:- If you’re looking for long, strong, and attention-grabbing nails, acrylic nail ideas are perfect. Acrylics allow you to shape your nails however you choose — square, almond, coffin, stiletto — and can last for weeks without chipping. You can keep it simple with a solid color or go all out with glitter, a marble effect, rhinestones and fashion patterns.
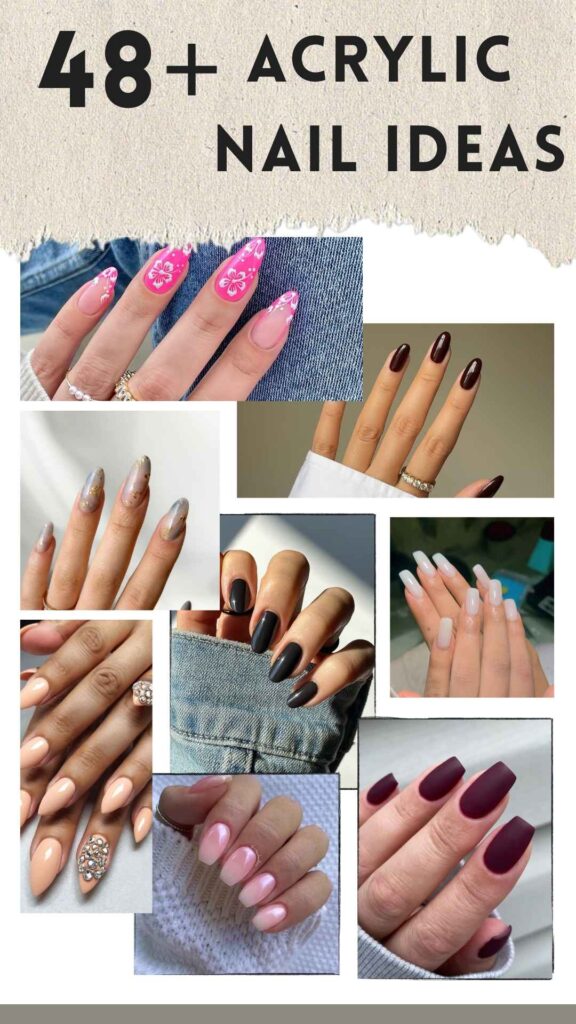
Some choose vibrant colors such as hot pink or electric blue, while others opt for sophisticated nude shades or French tips. Acrylics are wonderful for special occasions such as weddings and parties or holidays because they appear high end and professional. You can even experiment with themed designs, such as animal print, galaxy nails, and seasonal styles. If you love fun nails and want something that just screams, acrylics are the way to go. Just keep this in mind—they require some love and routine fill-ins to maintain their fresh and flawless look.
Acrylic Nail Ideas
Chic & Classic Acrylic Nail Ideas
- French Tip Acrylics — A classic white-tip style for long, square acrylics that’s clean and polished.
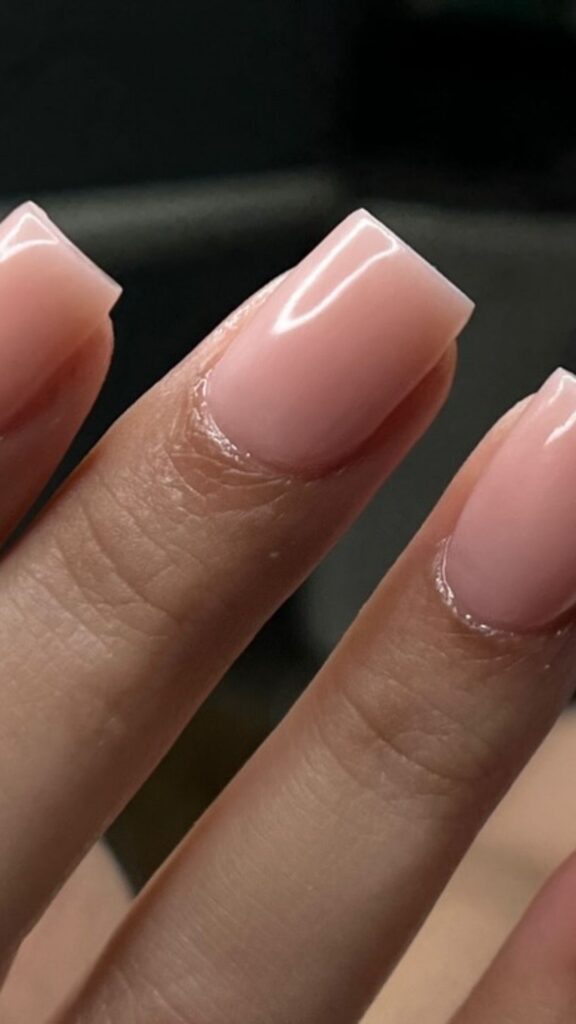
- Nude Coffin Nails − Subtle nude tones on coffin-shaped acrylics for that elegant, minimal vibe.
- Glossy Pink Almond Nails — A soft pink with a high-gloss finish on almond-shaped acrylics—so perfectly feminine.
- Matte Burgundy Nails – Rich, winey acrylics in a satin sheen for a deep, luxe vibe.
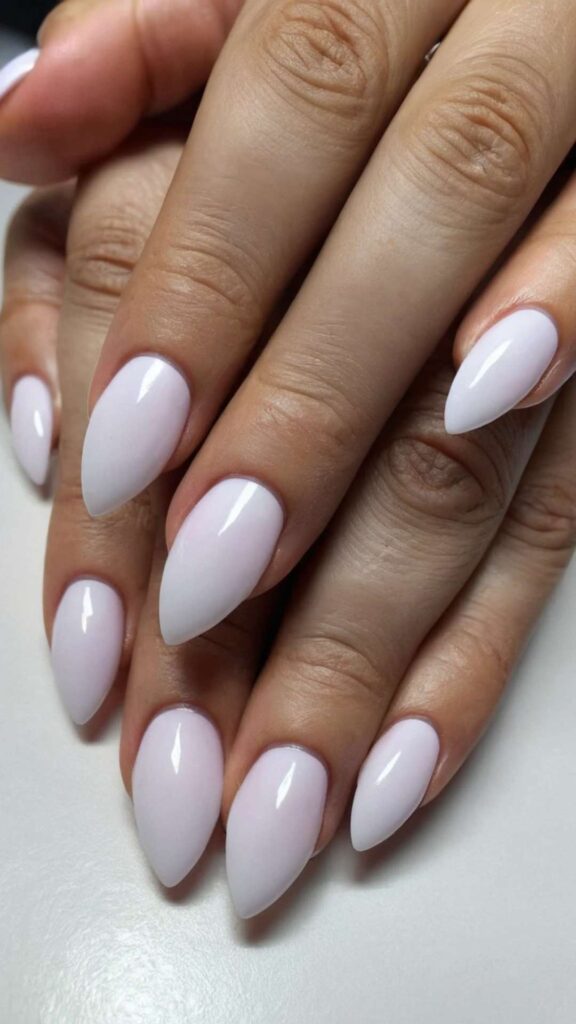
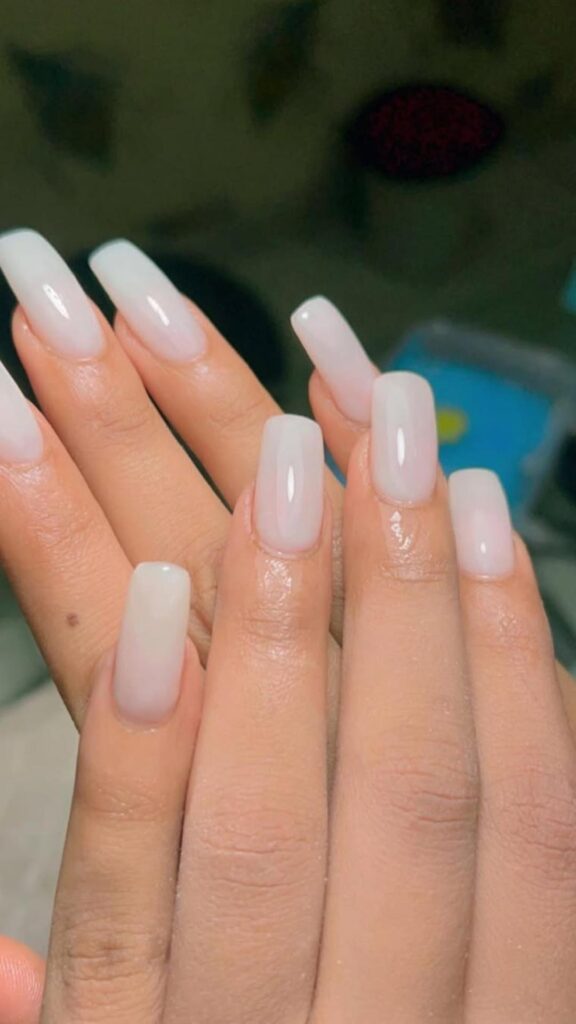
- Milky White Nails — Pair sheer white acrylics with a milky glaze for a clean, cloud-like effect.
- Short Square Acrylics – For the practical type, these short square nails are effortless and elegant.
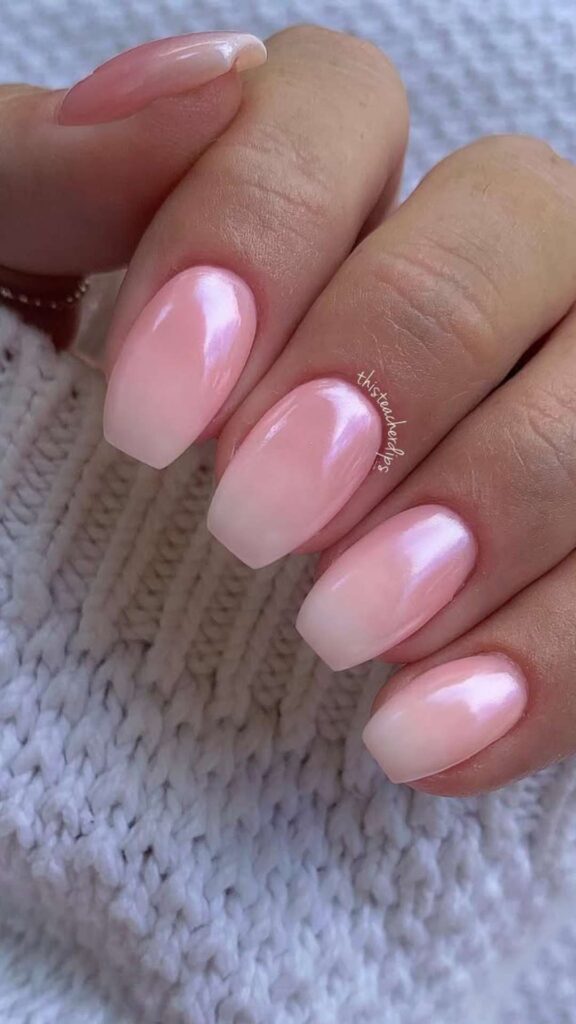
- Baby Boomer Fade — A soft dip between pink and white, aka the French ombré.
- Glossy Black Nails — A jet-black acrylic that’s glossy, bold, and a little bit futuristic.
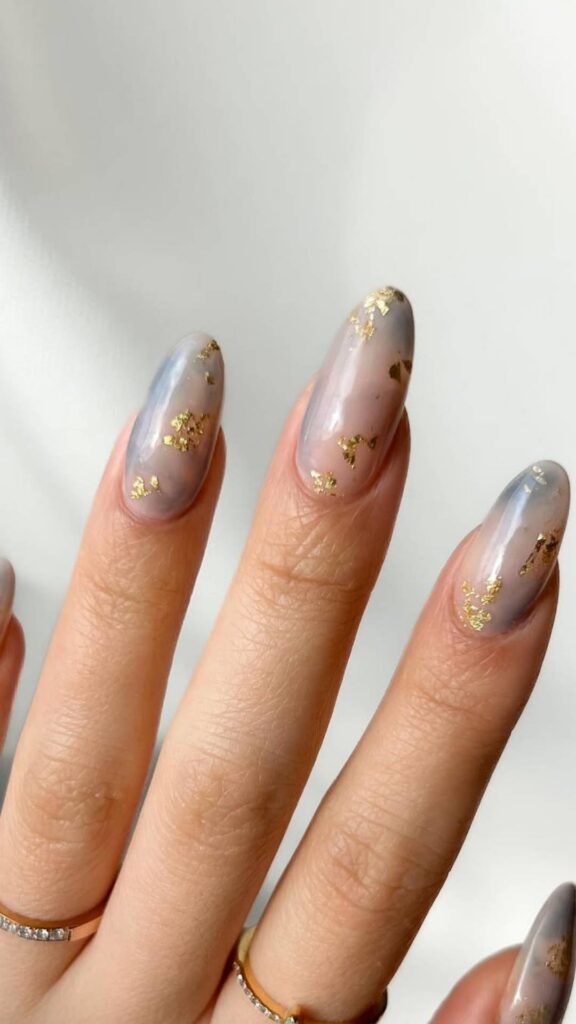
- Beige with Gold Foil – Everyday glam shades of creative neutrals with gold foil accents.
- Peachy Nude with Rhinestones — A peach-toned base and some sparkly gems placed close to the cuticle for a soft glam finish.
Colorful Acrylic Nail Ideas
- Welcome To Summer – Clear base acrylics with each tip a different bright color for a fun, summery feel.
- Pastel Mix—Each nail is painted in a gentle pastel hue for a dreamy spring-evoking set.
- Neon Orange Coffin Nails – Vibrant Orange Acrylics, Ideal for Holiday or Festivals Neon Orange Coffin Nails Bright orange acrylics look great with holiday or festivals. Neon is perfect for summer.
- Sky Blue Almond Nails – A peaceful, airy blue that works year-round and compliments all skin tones.
- Sunset Ombre — Smooth transitions of pink, orange, and yellow to mimic summer sunsets.
- Purple Chrome Nails – Metallic lavender acrylics with a mirror-like finish—futuristic and fabulous.
- Mint Green Matte — A pale green in a matte, perfect for spring or a fresh, clean finish.
- Coral And Glitter Combination – Sparkle and color combination by simply creating the glittery nails of oneself with normal coral nails.
- Hot Pink Tips – A more contemporary take on French tips, using a vivid, neon pink for a striking touch.
- Tie-Dye Acrylics — Bright swirls of colors on every single nail away for a fun, retro-inspired finish.
Glitter & Glam Acrylic Nail Ideas
- Rose Gold Glitter Tips – Clear acrylics with rose gold glitter fading at the tips.
- Full Silver Sparkle Nails — full coverage of glittery silver—perfect for a party!
- Holographic Chrome Nails – Rainbow-colored acrylics that sparkle with the light.
- Gold Glitter Ombré – A nude base that blends into metallic gold for a glam gradient.
- Diamond Dust Acrylics – Fine shimmer embedded in clear or light-colored acrylics for a twinkle effect.
- Emerald with Glitter Feature – Dark green nails, one or two glitter accent nails for contrast.
- Confetti Nails — Clear acrylics with multicolored flecks for a party spirit.
- Sparkly Black Stilettos – Glitter acrylics mixed with all-black stilettos for extra drama.
- Champagne Shimmer – A light, glittery colour that looks gorgeous with fancy fits.
- Iridescent White Acrylics — A white nail that shines pearly and iridescent from within — ethereal and one of a kind.
Artistic & Themed Acrylic Nail Ideas
- Butterfly Accent Nails – Pink or nude acrylics with a few butterfly decals or art on 1 or a few nails.
- Kitty Paws Marble Effect Nils – White and gray swirls for a marble-like design that looks super luxe.
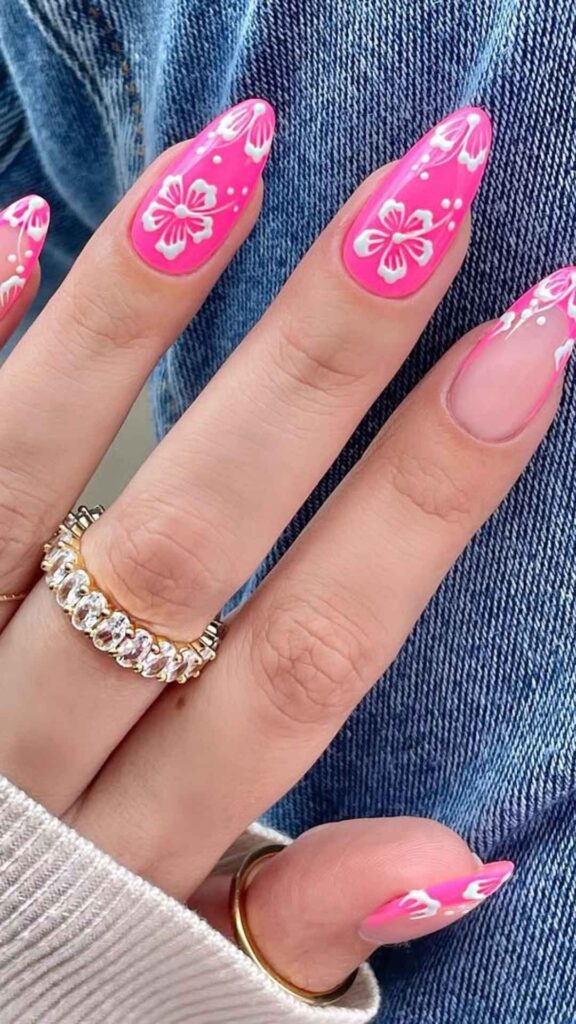
- Floral Nail Art — Delicate flowers painted on or stamped onto soft base colours for the ultimate romantic, garden-party-inspired look.
- Galaxy Acrylics – Cosmic hues sprinkled with twinkling stars and glitter for a celestial nail.
- Animal Tip – Leopard, zebra, or cowtip for a wild touch
- Snake Skin Texture – A reptilian effect that can be printed, or done in 3D for cool and on-trend acrylics.
- Cow Print Acrylics — A black-and-white speckled pattern on full or half the nail for a fashionable flair.
- Abstract Line Art – Simple contemporary line work etched over nude or pastel bases.
- Evil Eye Nails — Fun blue and white symbolic art for your nails with protective claims.
- Seasonal Themes — snowflakes for winter, pumpkins for fall or palm trees for summer — on-trend every day of the year.
Unique Shapes & Styles Acrylic Nail Ideas
- Clear Acrylic Tips – Crystal-clear tips that resemble glass, stunning with glitter or floating art.
- Double French Tips – Two lines of color instead of one at the nail tips for a modern update.
- Matte and Glossy Mix – Some nails in matte and others in gloss, or glitter and matte on the same nail for contrast
- Negative Space Designs – Clean sections or geometric cutouts for a contemporary touch.
- Textured Acrylics – For something completely unique, have a raised texture such as an abstract 3D bow, knit pattern or raindrop effects.
- Two-Tone French Tips – Split-color French tips in bright combos, such as red and pink or blue and green.
- Layered Foil Acrylics – Artistic, abstract appearance by layering multi-color foils under clear acrylic.
- Velvet Nails – A distinctive fuzzy-textured layer applied in addition to your acrylics, giving a plush, soft finish.
- Oil Slick Nails – Deep, iridescent shades that change from green to purple as light strikess.
- Split Design Acrylics — Half one color, half another — straight down the middle for a graphic effect.
How to Design for Acrylic Nail Ideas
1. French Pad Acrylic
- Prep & Shape: Nails should be clean with gently pushed back cuticles then filed to achieve a squared shape.
- Acrylic Application: Construct acrylic base then build its structure before flattening it out.
- French Tip Painting: Use exact strokes to draw white paint along the edges with care.
- Top Coat & Finish: Use a glossy top coat followed by curing to achieve shine while ensuring durability.
2. Nude Coffin Nails

- Prep & Shape: Acrylic application should begin with clean nails and followed by a trimming process before filing into a coffin outline.
- Acrylic Base: The coffin-shaped acrylic formation requires even distribution of mixture before final adjustments are made.
- Color Application: Choose any nude-colored polish to paint your nails.
- Seal & Shine: Place your choice of shiny or flat top coat layer for an attractive conclusion.
3. Glossy PINK Almond Nails
- Prep & File: Prepare nails into a flattering almond shape after you clean the cuticles.
- Acrylic Overlay: Use pink acrylics to build up your nail design then round off the almond curve.
- Gloss Finish: Set your finish with high-shine pink polish to create a feminine glow.
- Top Coat: Complete your manicure with gloss topcoat then apply ultraviolet curing to cure the polish.
4. Burgundy Matte Nails
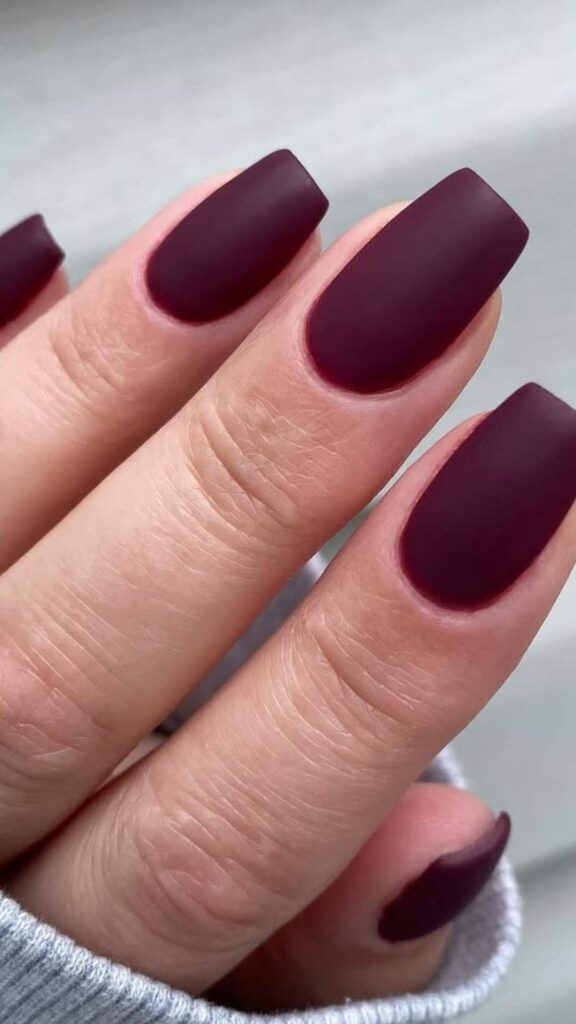
- Nail Prep: You should start with nails that are clean plus they need to be short with a light nail buffer.
- Apply Acrylics: Create your selected length by applying burgundy acrylic.
- Matte Color Coat: Let a rich burgundy manicure dry before moving on.
- Matte Top Coat: After applying the matte top coat your nails will achieve a luxurious velvety look.
5. Milky White Nails
- Prep Nails: Nails receive cleaning followed by cuticles pushed back while buffs provide the final step.
- Acrylic Base: Create smooth lines from sheer white acrylic materials.
- Glaze Application: Spatula the application of a milky white gel layer.
- Cure & Gloss: After curing you should complete your manicure by applying gloss
6. Short Square Acrylics
- Clean & File: The application process starts by trimming nails followed by square filing.
- Apply Acrylics: Construct short structured acrylic tips with clear or nude acrylic materials.
- Buff & Smooth: Smooth out the entire acrylic using final shaping adjustments.
- Finish: Smooth luxury onto your nails through clear finish or neutral nail polish.
7. Baby Boomer Fade
- Nail Prep: The nails should be thoroughly cleaned and trimmed into either almond-shaped or square designs.
- Two-Tone Acrylics: The pink acrylic goes onto the nail area closest to your cuticles while placing white acrylic at the tip.
- Blend Seamlessly: Use a gentle hand to brush pink color through white base until a gradient pattern appears.
- Seal & Shine: Apply a glossy top coat to deliver a professional polish.
8. Glossy Black Nails

- Prep & Shape: File your nails to the desired shape and surface while keeping it neat.
- Acrylic Base: Use clear or black acrylic to apply onto the nails.
- Color Application: Adopt a bright, high-pigment, glossy black nail polish.
- Glossy Finish: Top coat your manicure with ultra-gloss and allow it to cure.
9. Beige with Gold Foil
- Prep Nails: The first step involves cleaning then buffing and finalizing nail shapes.
- Apply Beige Polish: Begin by applying a neutral beige base color followed by letting the nail dry.
- Add Gold Foil: Thoroughly handle gold foil with tweezers when adding the accents to your fingers or nails.
- Top Coat: Use a clear top coat to protect your creation.
10. Peachy Nude with Rhinestones
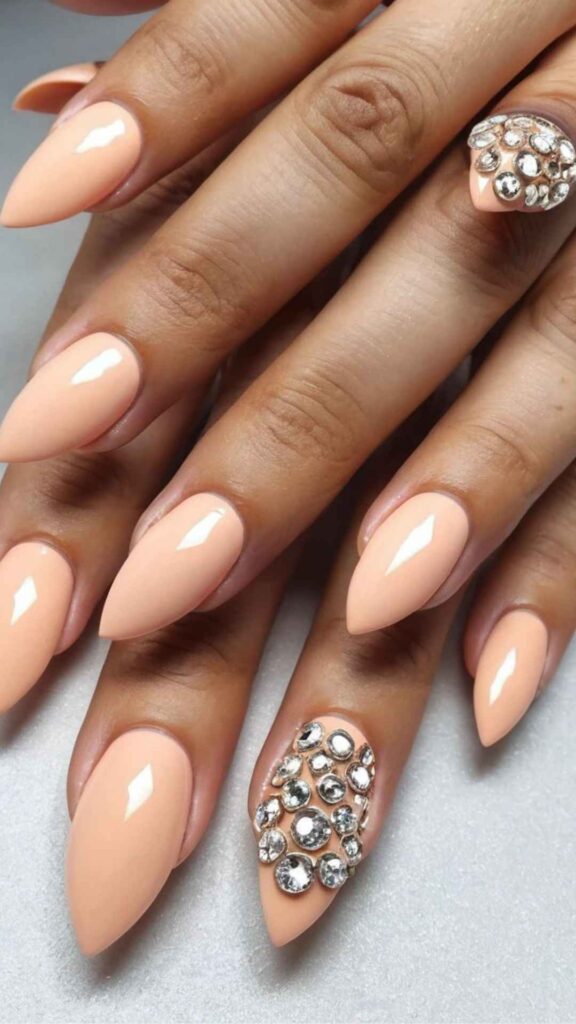
- Prep Nails: Begin by cleaning the nails before filing them into proper shape then use a shine remover if necessary.
- Apply Peachy Nude Base: Apply peach-toned nude polish across nails followed by a drying period.
- Rhinestone Placement: Use nail glue or gel to attach rhinestones next to your cuticles.
- Seal & Cure: After the design application, use top coat then let it cure until completely dry.

Hey there! I’m Ashlei Lynee, the heart behind fashioninstamom.com — your go-to destination for all things chic, stylish, and real-life fabulous. I’m a fashion-loving mama, an Insta-obsessed trendspotter, and a believer that motherhood and style can totally go hand-in-hand.
I started Fashion Insta Mom as a creative outlet to share my love for fashion, beauty, and all the things that make women feel confident, powerful, and put-together — even with a toddler on one hip and coffee in the other hand! From outfit ideas and closet must-haves to beauty tips and lifestyle inspo, I curate content that reflects the modern woman: busy, bold, and beautiful in every way.