
Christmas Nail Ideas for you, too — what better way to get into the festive spirit? From classic red and green to sparkly and bold, there are so many festive designs to choose from! Think snowflakes, candy canes, Santa hats, Christmas trees or even just glittery red polish for a low-key option.

Some go all out with elaborate holiday art and others stick with simple stripes, dots or a metallic accent nail. Try them in colors of gold, silver, white, or ice blue for a wintry feel. Christmas is an excellent opportunity to flaunt your holiday spirit by styling your nails for the season and polishing up your hands for parties or family gatherings. Even if you’re not a whiz at nail art, press-one and stickers for festive nails are pretty easy to do at home.
Christmas Nail Ideas
Classic Christmas Nail Ideas
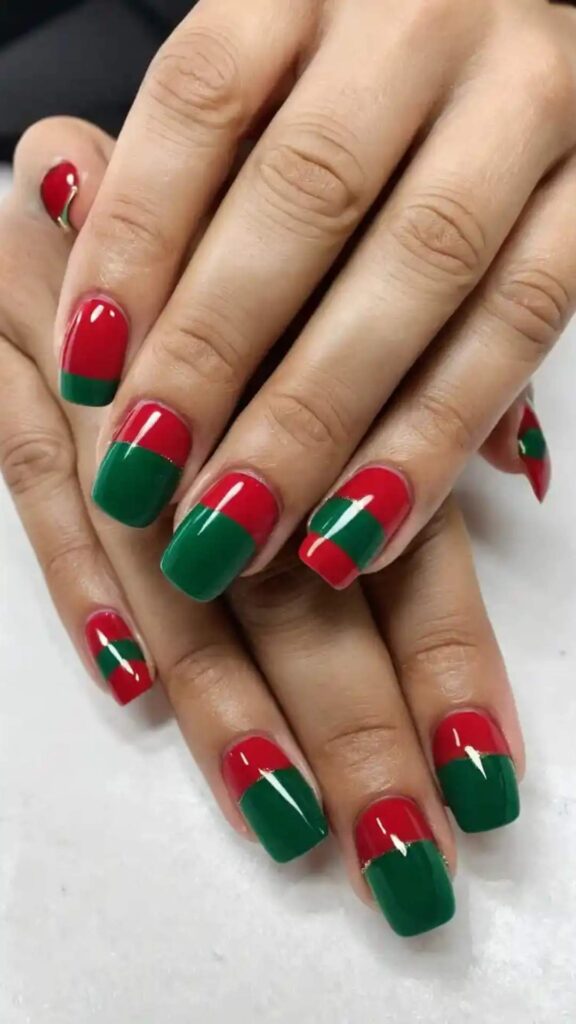
- Red & Green French Tips – A holiday take on the classic French tip in classic Christmas colors.
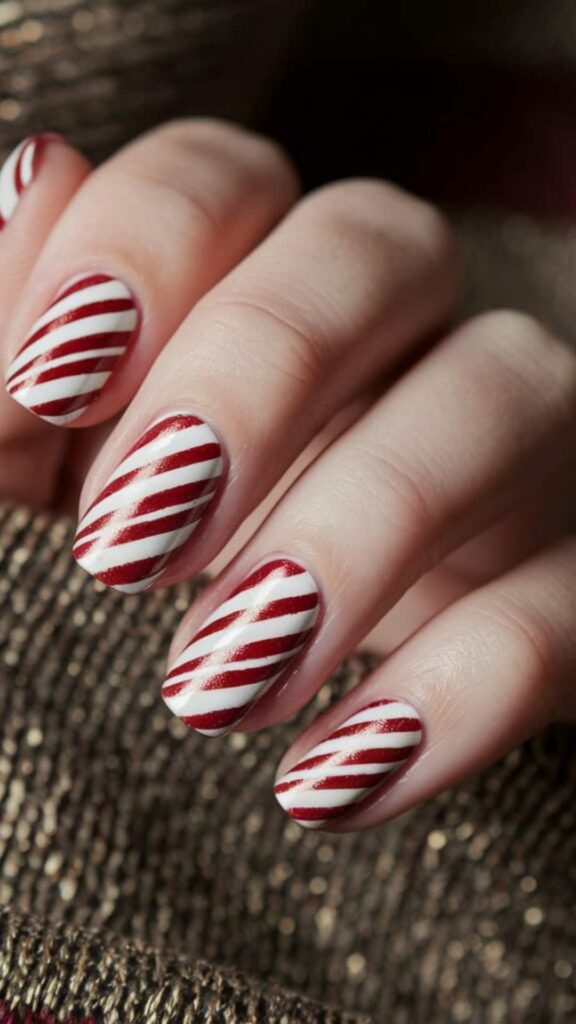
- Candy Cane Stripes – Red and white swirls that resemble a sugary candy cane snack.
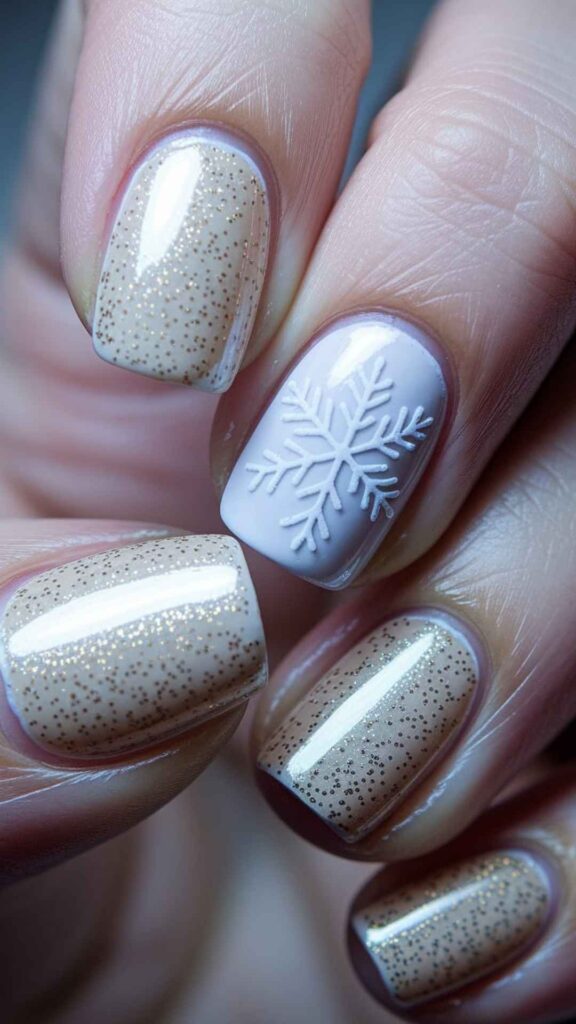
- Snowflake Accent Nail – Add a single frosty snowflake to one nail, on any base color, for an elegant touch.
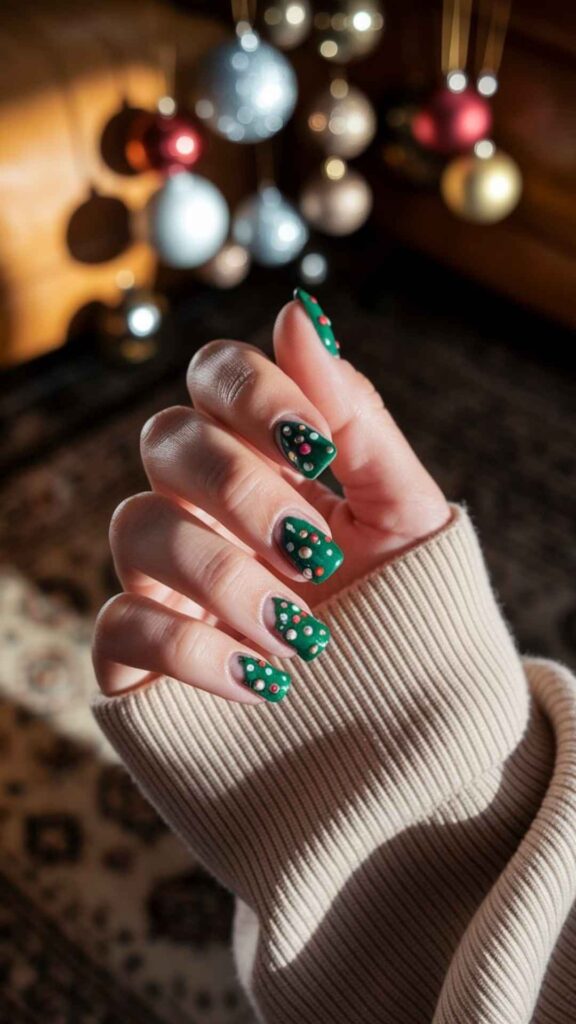
- Christmas Tree Nails — Mini trees decorated with stars and ornaments for a jovial vibe.
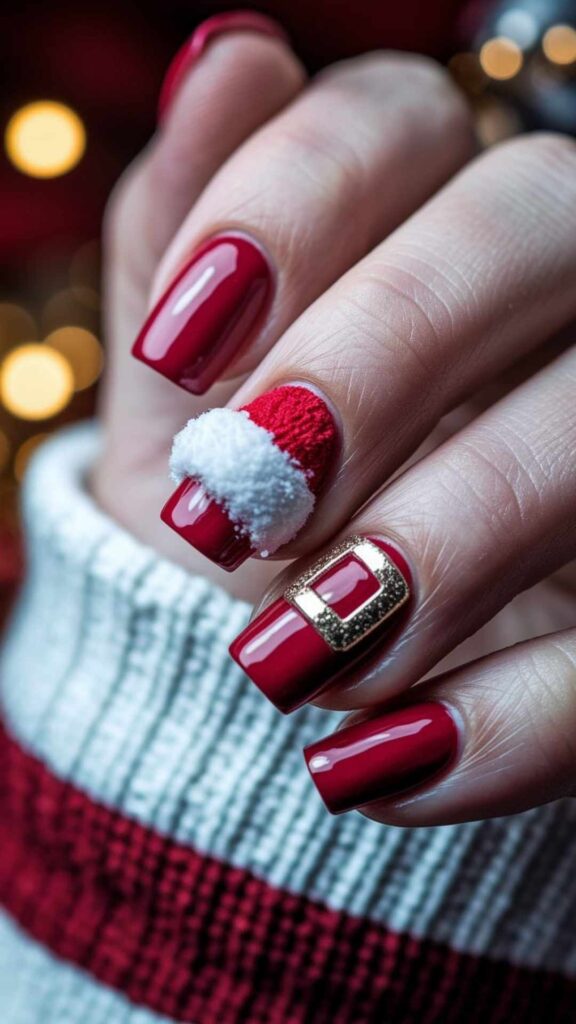
- Santa Hat Design – Red with white trim points, just like Santa’s famous hat.
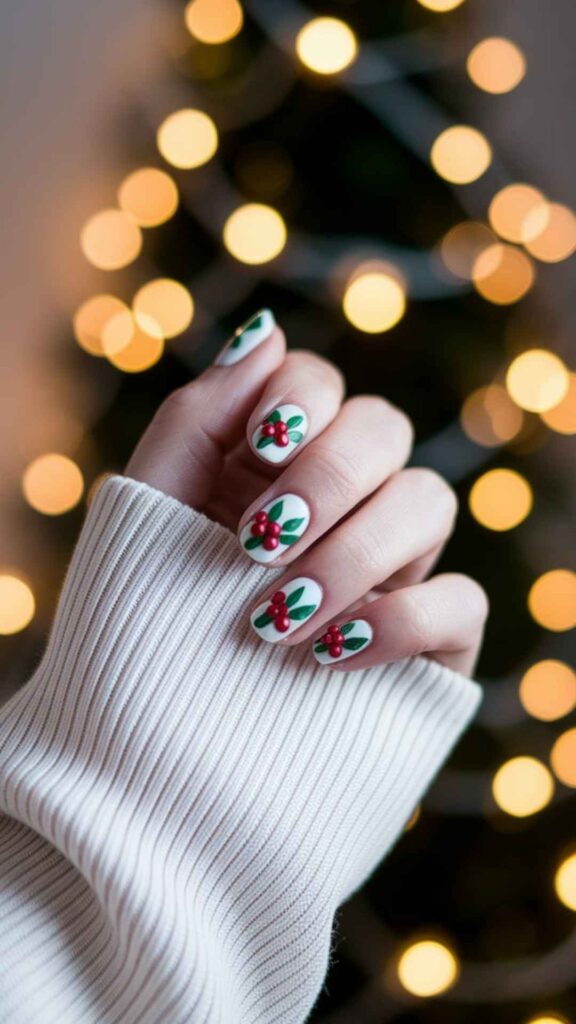
- Holly Berries Art – A nude base with green leaves and red berries hand-painted.
- Red Glitter Ombre – A gradual shift from solid red to sparkly tips; perfect for holiday parties.
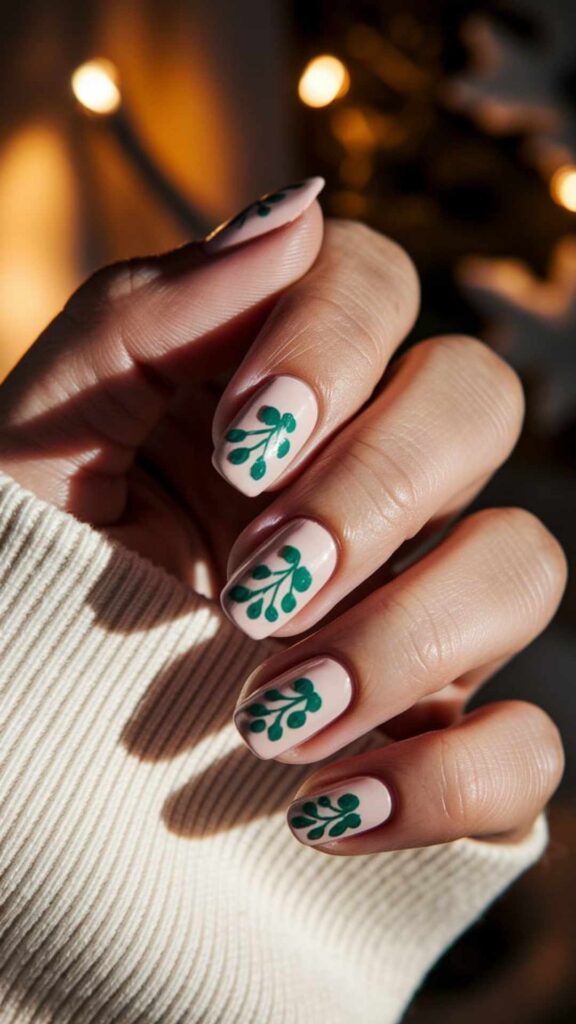
- Mistletoe Motif – Appropriately understated, romantic enough for holiday date nights.
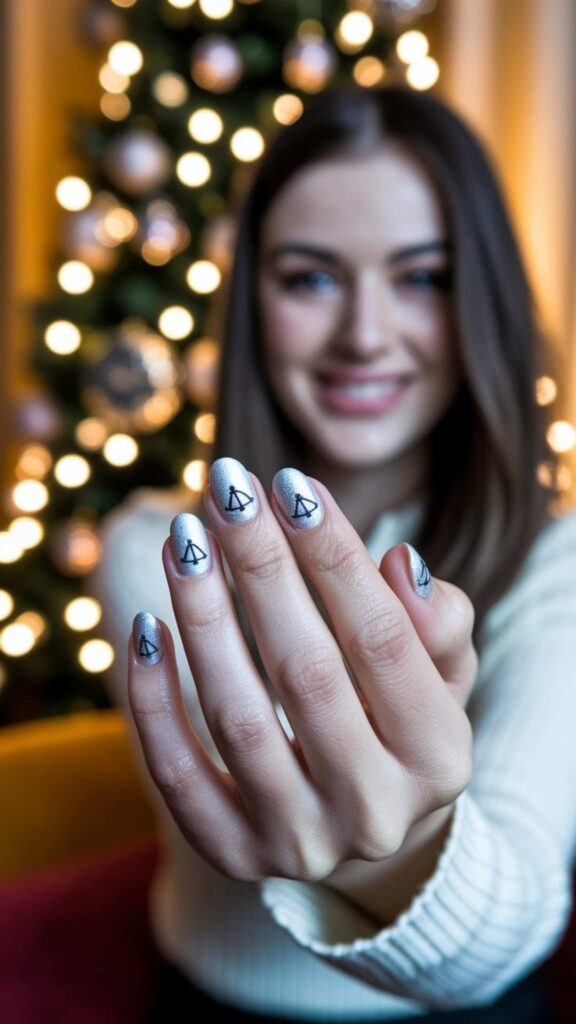
- Silver Bells Art – Metallic bells with lines drawn on the surface and an icy blue or white background.
- Classic Plaid Nails – plaid in red, green, and black cozy and timeless.
Winter-Inspired Christmas Nail Ideas
- Frosted Snowflake Tips – Light friable icy white snowflakes on translucent or pastel nails.
- Sweater Pattern Nails — Textured whites that are reminiscent of knitted sweaters.
- Blue & Silver Snowstorm – Blue base with silver snowflakes.
- Frozen-Inspired Ombre – Cool toned ombre blues with rhinestones for a magical touch.
- Icy Crystal Nails — clear polish with white flakes and chunky silver glitter.
- Nordic Winter Print – White And Red Scandinavian Print Design
- Ice Queen Nails – Pearl blue with snowflake stamps and gems
- White Christmas Sparkle – Solid white nails with chunky glitter for that fresh snow look.
- Aurora Borealis Design – Black read with changing greens, purples, and shimmer.
- Nail Art Matte Midnight Blue – Deep Blue matte nails with white or silver constellations.
Cute & Fun Christmas Nail Ideas
- Reindeer Faces – Reindeer heads, little red noses (hello, Rudolph!)
- Gingerbread Man Nails — Brown polish, adorable shapes for cookies, white icing lines.
- Santa Claus – Mini Santa faces or Santa belts drawn on red nails
- Elf Inspired Nails — Green and gold stripes with small elf shoes or hats.
- Snowman Nails – While base and little carrot noses and black eyes
- Grinch Green Nails – Green nails (Lime green or similar) with the Grinch eyes or expressions.
- Christmas Lights Nail Art – Colorful lights strung over a neutral base.
- Hot Cocoa Design – Cocoa brown base with marshmallow dots or mugs of cocoa.
- Ugly Sweater Template – Razmataz colors and patterns that resemble fun sweaters.
- Christmas Cats Nail Art – Stickers of cats in Santa hats for a fun take.
Elegant Christmas Nail Ideas
- Gold Foil Tips – A clear or nude base and gold foil at the tips.
- Rose Gold Glitter Fade – A pink-toned glittery sparkle with soft nude.
- Champagne Chrome Nails – A metallic shine that will compliment any holiday fit.
- Nude & Silver Lines — Minimal, shiny silver stripes on top of a nude girl.
- Velvet Red Nails — Cozy, rich matte red velvet.
- Marble Christmas Mix – Bold red, green, and gold swirled into a classy marble effect.
- Metallic French Tips – Chrome gold or silver on the tips for an elegant look.
- Foiled Rhinestones And Additional – One nail glittered, the rest bare or matte.
- Make it Shine White & Gold Art Deco – A glamorous take on shapes and lines with a holiday flair.
- Emerald Green Glossy Nails – A deep green polish topped with high-gloss using a top coat.
Creative Christmas Nail Ideas
- Gift Box Design – Nails designed to resemble wrapped gifts with bows.
- Peppermint Swirl Tips – For red and white swirls at the nail tips.
- Santa’s Sleigh Scene – This is an image of Santa as a tiny silhouette aross a dark sky.
- Christmas Wreath Accent – Small wreath with a bow painted on one or two nails.
- Pinecone & Garland Art — Earthy and green with brown pinecone accents.
- Minimalist Line Art – White, thin lines in Christmas shapes on nude polish.
- Galaxy Christmas Nails — Sparkly cosmic colors with white snowflakes or stars.
- Gold Leaf Snowfall – Gold foil snowflakes on a deep red base.
- 3D Ornament Nails – Small multi-faceted nail gems to resemble dangling ornaments.
- Matte Candy Cane Design — A matte version of the striped holiday treat.
How to Design Christmas Nail Ideas
1. Red & Green French Tips
- Prep Nails: File, shape, and buff nails; Begin by filing shapes and buffing nails followed by a complete clean.
- Apply Nude Base: Base your nails with a solid nude or a sheer pink polish.
- Create French Tips: Paint each nail tip using either red polish or green polish or create alternating color combinations between the hands.
- Seal with Top Coat: A glossy top coat both gives the nails a brilliant shine while offering protection against damage.
2. Candy Cane Stripes
- Apply White Base: Begin by painting each nail white before you let the polish dry completely.
- Add Red Stripes: Paint straight red lines by using tape or a striping brush in diagonal shapes.
- Clean Up: A brush with acetone solution should be used to smooth rough edges around nail tips.
- Top Coat: Apply clear top coat to finish and create smoothness over the design.
3. Snowflake Accent Nail
- Choose Base Color: Use any solid color you prefer whether it’s navy, silver or pale pink.
- Paint Snowflake: Paint tiny snowflakes onto one or two nails with the help of white nail art pens or fine brushes.
- Add Detail (Optional): Accommodate tiny gems or glitter particles at the snowflake’s core.
- Seal with Top Coat: A protective top coat will finish the design by offering shine with protection.
4. Christmas Tree Nails
- Base Coat: Apply either soft beige or light blue as background nail color for a neutral appearance.
- Draw Trees: Paint triangle tree designs on your nails with a green polish while using a dotting tool or small brush.
- Decorate Trees: Apply tiny red gold and silver dots with nail polish decorations to your ornaments.
- Finish with Top Coat: Use a glossy top layer to protect everything.
5. Santa Hat Design
- Red Tips: Draw red triangular nail decorations near the tips of your fingernails.
- White Trim & Pom-Pom: Create two nail art elements by drawing a white line below the triangle then adding a single dot near its point.
- Detailing: Use a brush or nail tape to achieve smooth edges on your nails.
- Top Coat: Clean polish should be applied to achieve shine and durability.
6. Holly Berries Art
- Base Color: Use nude or light beige paint to coat your fingernails.
- Leaf & Berry Design: Using green paint she fashioned leaf shapes which received two or three small red paint applications for each nail’s berry design.
- Accent Nail: Use this design on one or two fingernails if you want a lower-key manicure option.
- Seal with Top Coat: A glossy top coating applied to your manicure will produce a professional finish.
7. Red Glitter Ombre

- Base Color: Apply red solid polish to each nail until the entire surface becomes fully red.
- Glitter Gradient: A makeup sponge helps you apply glitter polish to the tip of your nails so you can blend the colors downward.
- Build Layers: Keep dabbing the polish until the color gradient fills each nail with a smooth even look.
- Top Coat: You should complete your design with a clear gloss polish layer which will blend the texture and apply shine to your nails.
8. Mistletoe Motif
- Base Coat: Ivory or blush pink should be your first nail color selection.
- Draw Mistletoe: Use a thin pointed brush along with small red dots as berries when you paint the green leaves.
- Accent Design: Mistletoe nail art looks elegant when crafted on only one or two nails.
- Top Coat: Seal with a high-gloss finish.
9. Silver Bells Art
- Background: Your manicure should begin with icy blue or white nail polishes.
- Paint Bells: To create silver bell shapes brush a fine tool across the nails or use decorative strips.
- Add Details: You can make bell lines with black or gray shades along with dark-hued highlights through those colors.
- Top Coat: The use of a clear finish coat both improves shine while shielding your nails against possible damage.
10. Classic Plaid Nails
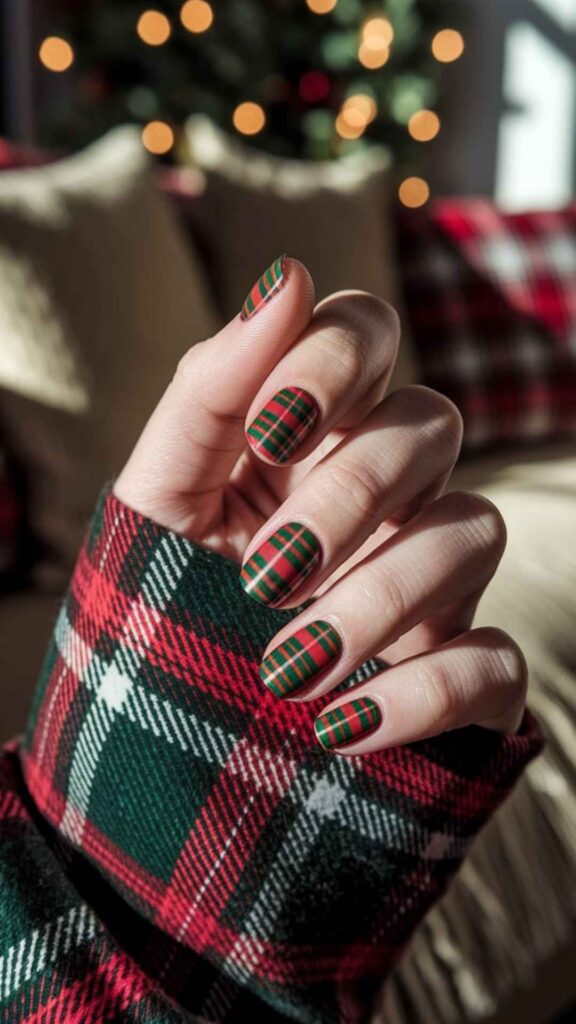
- Base Color: The neutral base colors, light beige or white, or nude, can serve as excellent starting points for your manicure.
- Create Plaid: Paint thin black-red-green stripes onto your surface by using striping tape and a set of brushes.
- Build Layered Effect: Obtaining an authentic plaid look requires drawing lines of diverse widths so they interlock with each other.
- Seal with Top Coat: A glossy finish acts as protection for your design while extending its lifespan.

Hey there! I’m Ashlei Lynee, the heart behind fashioninstamom.com — your go-to destination for all things chic, stylish, and real-life fabulous. I’m a fashion-loving mama, an Insta-obsessed trendspotter, and a believer that motherhood and style can totally go hand-in-hand.
I started Fashion Insta Mom as a creative outlet to share my love for fashion, beauty, and all the things that make women feel confident, powerful, and put-together — even with a toddler on one hip and coffee in the other hand! From outfit ideas and closet must-haves to beauty tips and lifestyle inspo, I curate content that reflects the modern woman: busy, bold, and beautiful in every way.